Salvaged Wood Farmhouse Table
Want a salvaged wood farmhouse table? Check out how we transformed our existing wood table using reclaimed wood and a white wash technique.
Today I’m excited to share our latest DIY project using salvaged wood. Somehow, in the midst of our entire main floor renovation, we managed to build a farmhouse table.

Thank you to RYOBI for providing power tools plus compensation for sharing my farmhouse table project. As always, opinions are 100% my own.
I know, a bit crazy with all the chaos going on, but our reward was being able to play around with some new tools thanks to RYOBI.
For the longest time, I’ve been shopping around for a new dining table. In fact, I found one several months ago, but it was quite pricey and a little big for the space we currently have. So, I thought, why not make over our existing table for the time being and address the elements we no longer liked.

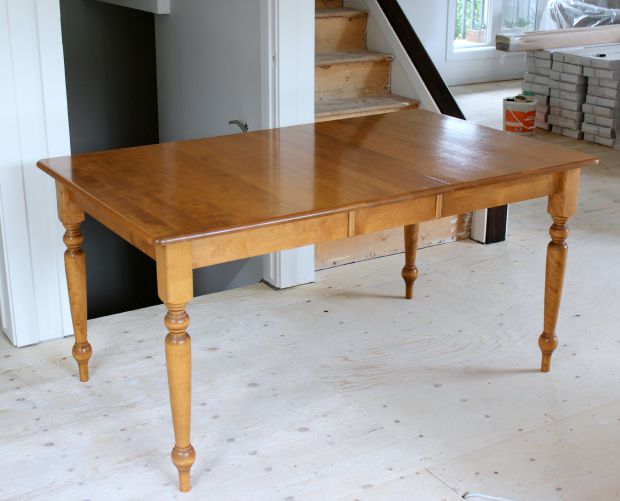
Table We Started With
Our table was as sturdy as the day we bought it almost 20 years ago, but the golden colour looked dated and I wanted something with a little more character and a little more size. You know those distressed tables that get better with age and it doesn’t really matter if you ever use a placemat? That’s the kind of no-fuss tabletop I was after.
Earlier this summer, we ventured out to my husband’s cousin’s place in the country to search for some old wood for the top. We could’ve used new, but it’s difficult to replicate the look of reclaimed wood (in my opinion), and I wanted it to look authentic.
Fortunately, we were able to find what we needed in a huge wood pile. Let’s just say it took some digging around, but perseverance always pays off, right?

Prepping the Reclaimed Wood
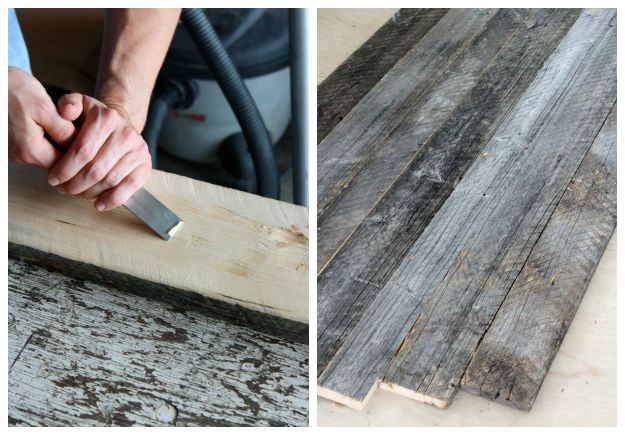
The wood was a bit wet when we brought it home, so we scraped off the dirt and moss with a putty knife and laid it out in our garage to dry. Once again, our neighbours walked by with looks like, “What are they up to now?” Happens regularly!

Next, my husband got to work pulling out rusty nails and trimming off the damaged board ends with our new Ryobi circular saw.

In the meantime, I removed the existing tabletop with our handy new Ryobi cordless drill, which was super easy.

Okay, time to start putting it together!
DIY Salvaged Wood Farmhouse Table
I made sure the existing table base was clean and lightly sanded, then primed and painted it using Benjamin Moore’s Fresh Start, followed by White Dove (OC-17) in an eggshell finish.

After laying the reclaimed wood on the base, we realized the table was going to be too tall. So, we ripped each board in half using the table saw. Definitely something we didn’t plan on doing, but it was worth the hassle in the end.
To ensure the boards were flat on the bottom, my husband chiselled down the high points and sanded off any rough bits. You could use a planer if you have one, which would be much easier.
Next, we played around with the board placement to make sure there weren’t any big gaps.

To clean up the boards, we went over each one with a wire brush and palm sander, and marked how they’d all fit together with masking tape. We used a tape measure to ensure each board was long enough without there being too much of a crack or huge splinter along the way, and adjusted as necessary.

To attach the boards to the table base, we flipped each one over lengthwise, set the base on top and carefully measured until it was sitting as even and square as possible on the top. My husband screwed through the existing base holes while I held the top boards together with a bit of pressure.
For reinforcement, we added cross braces along the back (5 in total) and a couple angle brackets to each end to keep the board ends secure. There probably won’t be any table dancing going on, but it’s better to be safe than sorry!

We carefully marked the finished length of the table (62″) and cut the excess off. Getting a straight line was easy with the built-in laser guide on the circular saw. Such a cool feature!

Prepping the Table to Finish
After a bit more sanding over the whole top and ends, the table was ready for stain and paint.
Although I liked the look of the reclaimed wood when we brought it home, sanding revealed some dark coloured crosscuts I wasn’t too fond of. It also looked a bit green in parts. I played around with some stain and paint on sample boards and found a technique I was happy with.

I plan on sharing the steps for this white distressed look in an upcoming post when our appliances aren’t in the middle of the kitchen (flooring goes in this week) and I can take better photos.
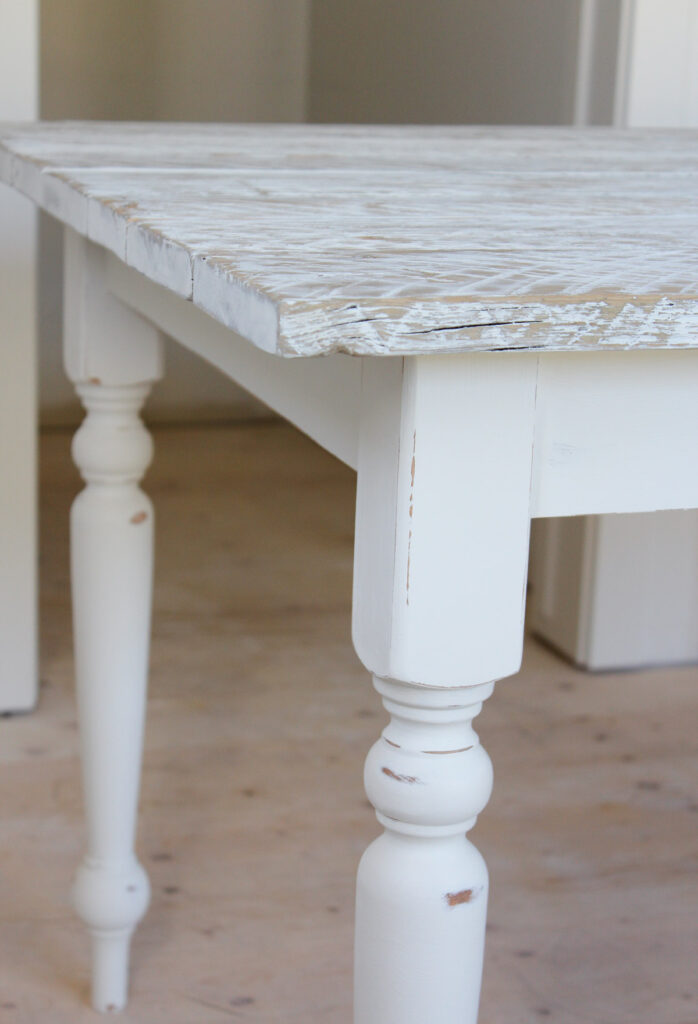
Until then, here’s a look at the finished table (minus the protective coat).

Update: See the Whitewashed Wood Finish Technique

This distressed farmhouse table is much better than the original one, right? And, other than a lot of time, it didn’t cost a thing except for a bit of sandpaper and small bottle of stain. So, let’s say $15 total (plus pizza and wine)!
Can’t wait to see how it looks in our newly renovated kitchen.
Be sure to pin this reclaimed wood dining table for later!

You may also want to check out the outdoor side table we built using leftover reclaimed wood from this project.

More DIY Projects
Be sure to check out these impressive project ideas by some of my blogger friends:
Fynes Designs
Setting For Four
The Sweetest Digs
So many great DIY ideas using cordless tools from the RYOBI 18V One+ System just in time for:

Ryobi Cordless Tool Giveaway
Enter for your chance to win a RYOBI prize pack containing a Drill P818, Circular saw P506 , Nailer P320 and Trimmer P2210 valued at over $500!
Note: This giveaway has ended.
Want more home improvement projects like these sent directly to your inbox? Be sure to SUBSCRIBE.
Good luck!


I LOVE how this project turned out!! You completely transformed the look of your old table base and the new reclaimed wood top is perfection. Great work on the paint and stain too!
Thanks Jen! Nice to have a “new” furniture piece without spending much. Love that table you have in your basement with the red. So gorgeous too!
Wow! Great job you two. I love it and I can’t wait to hear about the paint and stain techniques. I just love taking something old and discarded and turning it into a loved piece to be treasured. And it’s even better when you do it together and it has a great story!
Thank you! It’s great to hold on to the piece since we bought it with wedding money and there are so many fond memories around that table. I’m with you on the furniture pieces that tell a story. I’m sure your house is filled with them since you are the sentimental type like me!
LOVE LOVE LOVE everything about this!! I was going to pop over to see it personally, but since there is no table dancing I don’t see the point now ;) The finish is awesome, can’t wait to read how you did it!
For you, I will make an exception! There may be some table dancing when this renovation wraps up (hopefully very soon)!
Whoa! Shauna – this is beautiful! I am in awe of your talents!
What would I build? Probably a sofa table. :)
Oh, I’d love to see your sofa table. You are very talented yourself, girl!
This is GORGEOUS Shauna! What a beautiful table! I can’t wait to see it in your newly renovated home!
Thank you Jo-Anna! Reveal pics are still a bit away, but progress updates are coming!
Gorgeous Shauna! I love everything about it – you guys really put a lot of love into it , it shows!! Love the stain color too!! Bravo! :)
Not sure it was always love during the building phase, lol, but it will definitely be treasured in the years to come!
Beautiful transformation! What would I build? A sofa table for my daughter-in-law’s birthday. She’s got one pinned I could probably handle!
Seems to be a common theme. Good luck!
Beautiful Shauna! I love the look of it & how special that the base has meaning too! I’d love to get a Richard to build me a raised garden next summer :)
I think it would’ve been a bit hard to let go of the table we’ve had so many fond memories around. Raised bed gardens are the best, aren’t they? Here’s hoping he finds time for some building in the spring!
I LOVE it! What an awesome job, Shauna, and I’m with you on the black cross-hatch marks. Your stain looks so fresh and clean. We just bought a Ryobi circular saw last weekend! I needed to put up more Audrey shelves, and in the past my Dad has popped over to cut the boards for me, but now we live an hour and a half away… so it was time to become a grown up in the skill saw department ;-)
Yes, it was just a bit too rustic for my style which tends to be light and airy. Those saws are the best! Love the laser guide and cordless feature, for sure! I’m sure you’ll put it to use time and time again.
Oh I love your table Shauna, that turned out SO good!! I’d love to try one too (and I already have a hoard of barn wood drying in our garage), thanks for the chance to win a RYOBI prize pack – what a fantastic giveaway!!!
It’s totally doable. Just requires a bit of patience fitting the boards together and getting them smooth enough for a tabletop (don’t want any splinters!). We have some left over boards that we may use for a coffee table or side table. I’ll probably do one of those in the original “barn wood” finish.
Love this!!! The table looks so awesome!
Thanks Ali. I’m sure you’ll be enjoying a meal around it very soon (when the reno is done, that is)!
LOVE your new table, Shauna – you totally nailed it! I think after seeing your project, I would want to make a little side table for my family room just like that!
A mini version would be perfect. Send me a photo if you end up doing it!
Great project! I have the very same table base and you’ve got me thinking about a makeover for it.
Why not, right? It’ll save you a bunch!
You did an amazing job! If I won these tools would definitely help us with our deck reno and I am sure a few other jobs.
I really need some shelves built in my storage room and these would definitely help!
I would build a coffee table. We have been without one for a long time. Love your project- turned out so beautiful
hmmm not sure what i would build, maybe a wooden doll house for my niece, or some shelves for my kitchen
i would build new bookcases
I would build a better garden area.
We just bought a new house and we would like to build a tool bench and some storage in the garage.
Hubby and I have been wanting to design and build a treehouse/climber for our kids! It would be fantastic to have all the right tools. :). I love how your table turned out!
I really need a new coffee table for my cabin. Something rustic looking like this beautiful table!
Table looks great!
I’m going to build a three compartment composter for our yard followed by a bench that surround a group of cedars in our yard!
i would try to make a bench for my porch
we just moved into our new house a week ago and there are a lot of jobs I can keep hubby busy with :) starting with the basement
this is perfect timing, we just bought a house and I need to rebuild the deck
We are tearing our deck down soon and building a new one next spring. This would be an amazing prize pack. My Hubby would collapse for sure!
We are landscaping the property right now and I would LOVE to build some garden beds and some outdoor furniture. Not to mention the hubby and his passion for tools…
I want to build a reading nook!
I would attempt to make garden planter boxes for next season. I’d also like to attempt to make a small cat house.
My hubby would use it to build be a bookcase :)
a new aquarium stand would be fun to build!
to build a new closet
Our deck SO needs to be replaced to i would make my hubby do it ASAP with these tools!
Id build a bench for our piano
I would build a new deck.
I would use it to build a new closet in my room along with my wall hanging crafts.
We have a home that is over 100 years old. We are trying to fix room by room, but it takes time to get . These would help out quite a bit. Just when you get one thing fix there is another!
I love what you did with the table. I have the same table and have been wanting to replace the top with a farmhouse plank top and this was the inspiration I needed.
My house was built in 1920 and I have been slowly redoing each room and pretty much only use ryobi tools. Recently my circular saw, very old given to me by my father, quit…just as I was starting on a new plank top for a sofa table. Yet another project that is on hold now.
Thanks for the inspiration as well as the opportunity to win some great quality tools.
Hi Shauna. Thank you for the opportunity to raffle for Ryobi. Your table is inspirational. I would build a similar one but 1/4 the depth for the hall. I love your style & your blog. Looking forward to the kitchen reveal! …Donna
Fantastic transformation! I too have a table that needs new life and its really dark and serious looking! We moved to the beach and here now is my new inspiration, thanks Shauna!
I would be building more seating from pallets for our deck.
Great job . I love it
i would build a toy kitchen out of a dresser for my son to play with
I’d probably want to build some picture frames first but would end up having to fix the steps on the deck before I did that!
Stunning job on this table! It is loaded with character! Well done! I have enjoyed browsing your blog, you do lovely work and have a great creative mind! I would be so happy if you would come share some of your pieces at my Making Broken Beautiful Party. It runs every Thursday thru Sunday. I do hope you will come and inspire!
Have a great week!
Terry
Thanks Terry! I will check it out.