Burlap Table Favors for Christmas
These burlap table favors are an easy, inexpensive and fun way to dress up the kids’ table for Christmas. Make a set of your own using ribbon and basic supplies!
Welcome to the final instalment of this year’s One Item Project Challenge. We’ve had a lot of fun over the past few weeks getting creative with glass paint and branches. This week I chose RIBBON as the craft supply we all had to work with. It’s relatively inexpensive, very versatile and most of us already have some (or a lot) on hand.

Before taking another trip to the craft store for this project, I decided to look through the box of ribbon I already had. I seem to have a slight obsession with ribbon, and it can get out of hand if I don’t exercise restraint. I justify it as one of those “you never know when you’ll need it” items, when in actual fact, I think I’m just a bit of a ribbon hoarder. Why? I don’t know. I can get lost in a ribbon clearance bin at the craft store, so now I just stay away!
I’m glad I started to dig around the house because these table favors ended up costing me nothing. I think we’re all looking for ways to save money during the Christmas season, right?

DIY Burlap Table Favors
Supplies
- 4″ wired burlap ribbon (14″ x however many favors you wish to make)
- 1/8″ and 5/8″ decorative ribbon (6″ of each x number of favors)
- Hand sewing needle
- Thread (same color as burlap)
- Glue gun
- Scissors
- Gift tags (mine were free printables)
- Filler (candy, small toys, written messages, etc.)
How to Make Burlap Favors
Cut a length of burlap ribbon about 14″ long.
Fold under 1½ inches at the top and ¾ inch at the bottom.

Fold the entire length not quite in half so the bottom portion is about ½ inch lower than the top. Squeeze the wire in place so it holds.

Cut a piece of your decorative ribbon a little wider than the burlap so you can fold under the ends on either side (just the top layer).
Use your glue gun to secure it in place. (I used a bit of the glue to hold the burlap fold in place at the same time on the underside.)

Fold the pocket back up and stitch the sides together using a whip stitch from bottom to top.

Secure with a knot at the top.

Tie your gift tag to the top left corner of the pocket with your 1/8″ ribbon (simply put it through one of the burlap holes).

Note: I found my free tags at The Caroline Johansson and printed them out on white card stock.
My burlap favors are for my nieces and nephew, and these ones seemed to have a youthful cheery vibe. You can check out some other options on my Printables board on Pinterest, plus I have these woodland printable tags.
What to Put in Table Favors for Kids
These favors can be filled with whatever your heart desires. For the kids, I’m stuffing them with candy canes, wrapped candy, written messages and photos from past Christmases. You could also use gift cards, lip balm, hot chocolate packets, hair accessories, trading cards and more.
I will be taking them with me to put on the kid’s table at my parent’s house on Christmas Day (it’s a tradition I started last year).
All that’s left is writing each person’s name on the favors to double as place card holders.

I can think of so many uses for these burlap pockets and they can definitely be personalized to suit almost any party by changing out the ribbon, tags and filler.
For more fun ideas, check out the Christmas Gallery, where you’ll also see my Mini Wreath Gift Tags.

More Projects Using Ribbon
If you’re wanting to use up some of your ribbon, check out these projects too!
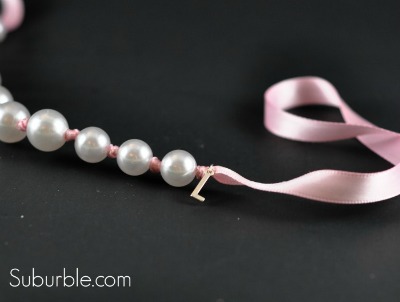
Girls Ribbon Necklace by Suburble

Merry Christmas Ribbon Garland by My Uncommon Slice of Suburbia
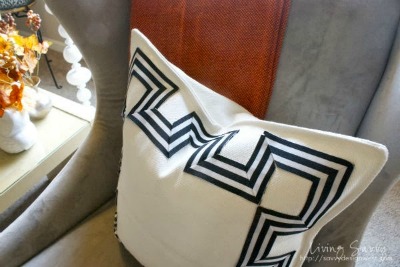
Ribbon Pillow Embellishment by Living Savvy
Thank you for following this year’s One Item Project Challenge. Now I can’t wait until the next go-around!
Want more holiday and seasonal ideas like these sent directly to your inbox? Be sure to SUBSCRIBE.
Enjoy your day!
Super cute! I love the printable tags! The burlap looks great with the bright colors!
Such a great idea! They are adorable. Have you seen that burlap ribbon in red?
I have, and also in other colors and even prints. So easy to work with!
Oh yay! I’m on the hunt for it in red then! My girls would love those at their place settings. Thanks Shauna
They have a selection at Michaels (by the fabric section) and mayarts.com has a bunch too.
Such a fabulous idea! Love this idea! Thanks for having me along in the party and a very happy Thanksgiving. XO
Burlap always seems to add a nice touch to any project. I would have never thought to use ribbon in this way. This has been a fun challenge to follow!
Shauna – this is such a great idea! I love it!
(And I’m pinning it right now!)
These are too cute! What a great idea and beautiful tags!
What a great and simple idea! I’ve made a wreath out of burlap flowers but it took a long time and lots of hot glue on the fingers! I have some left, I am going to make a few little pouches too!! Great blog! Nicki x
You are so creative. Love what you come up with all the time!
And they’re free printables!!!??? OMG Love these!
IMO, everything is just a little better with burlap. So cute!
LOVE these! They would be great envelopes for gift cards too!
Don’t you love it when you have all the supplies on hand & you don’t have to run to the store? These turned out so cute, Shauna! I’m really getting excited about making some gift tags this year. I’m hopping over from Inspire Me Please & I hope you have a wonderful night!
They look great Shauna and the tags are cute too!
Love the burlap bags – the fresh and pretty colours you’ve matched to the burlap makes it look amazing!
Thanks for the tags!
I really like your burlap table favor, and you know what… I didn’t know you could get burlap wire ribbon!!
Cute! I’ve linked to your tutorial over at Craft Gossip!
–Anne
Totaly adorable! Love the idea