White & Marble Fireplace (The Makeover Details)
Our white fireplace makeover is done! Find out how we used inexpensive trim, BM White Dove paint and marble subway tile to give it a fresh new look.
A big thank you to Metrie for partnering with us on our fireplace makeover. As always, opinions are 100% my own.
I’ve been looking forward to sharing our fireplace makeover with you for quite some time now. It seems like an eternity since we started this home improvement project, doesn’t it? I even joked way back in the summer about getting it done in time to hang our stockings for Christmas. It looks like we made it, but with little time to spare. Phew!
Thankfully, it’s been a mild fall and we really haven’t missed using our fireplace all that much. But, with the hefty dump of snow we got this week, the timing couldn’t be better to fire it back up. And, with its fresh new look, I simply cannot wait to decorate it all up for the holiday season!
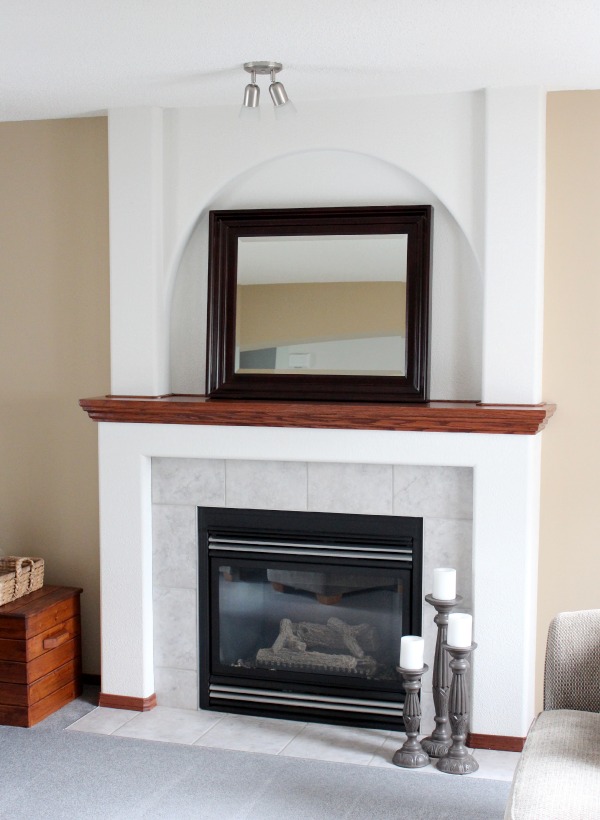
When we started our main floor renovation, the plan was to update the fireplace using as much of the original structure as possible to keep costs down. We didn’t mind the existing mantel, but the textured surface, rounded corners and arch all had to go.

Most of the time, I keep our fireplace decor to a minimum. I usually start with a mirror, lean a piece of artwork in front and finish it off with a potted plant or candle. However, a few times a year, I do enjoy adding more layers, so a mantel on the generous side is best for us.
Fireplace Makeover Process
Ready to see what it took to update our fireplace? I’ll walk you through the process…
Building the Fireplace Mantel and Adding Detail
In order to get the depth we were looking for, we first had to push back the upper section of the old fireplace before the whole thing could be covered in drywall. That meant being left with gaping holes where the original framing was- ugh. We had no other choice but to build a new mantel.

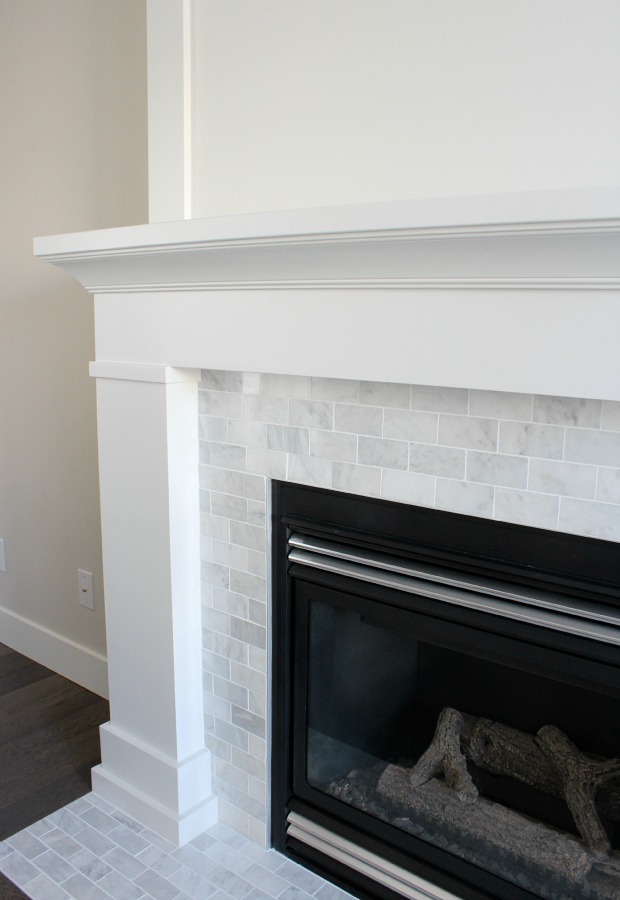
Since we were planning on painting the entire fireplace white (I do love a white fireplace), we were able to keep costs down by using MDF and simple mouldings from Metrie to trim it out.
I came up with a rough plan for our fireplace makeover and worked with our carpenter to get the design just right. And, because so many of you asked, I put together a post that includes front and side view drawings of the fireplace along with measurements. I also included a list of building materials.

Our carpenter cut a sheet of 3/4″ MDF to finish off the top of the mantel (which fit like a glove I must add!) and used the same material to trim it out along the front (mitering the corners). He then used it to create the layers at the bottom for the baseboard. To finish it off, we applied MDF casing, door stop material and crown moulding.
We wanted a clean look, but there are many trim styles to choose from if you’re looking for something with a little more detail. It’s definitely an inexpensive way to add character to a fireplace.
Painting the Fireplace BM White Dove
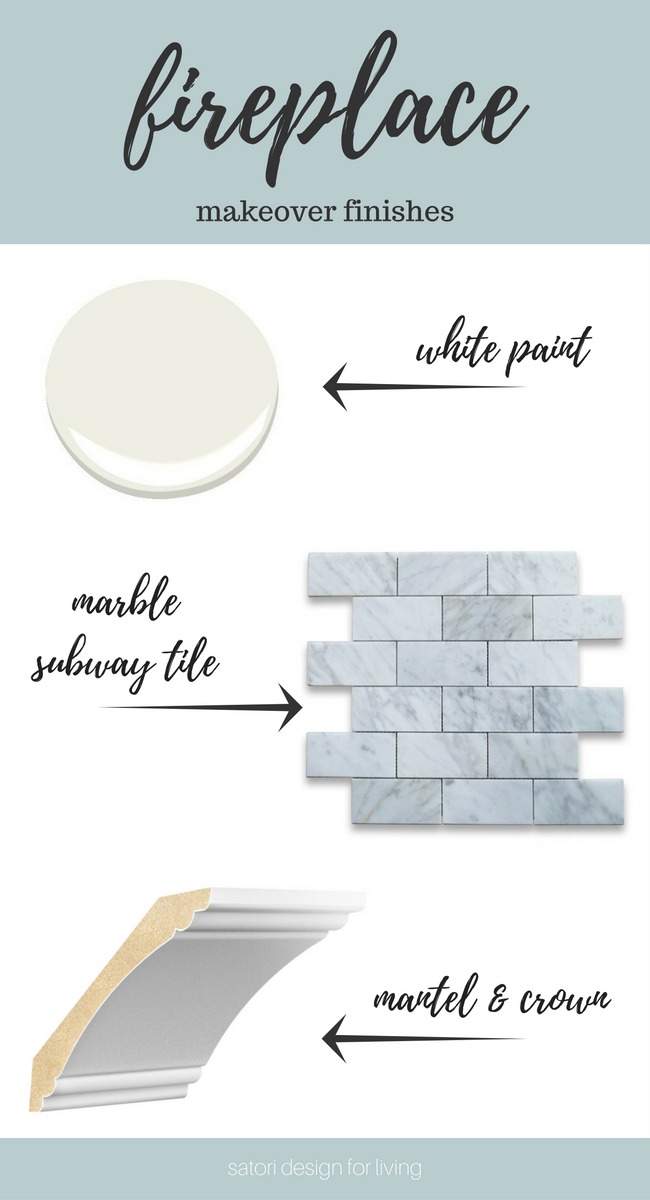
All of the nail holes were filled and sanded, then everything was primed and sprayed in Benjamin Moore White Dove. Thanks to our painter, the finish turned out flawless!

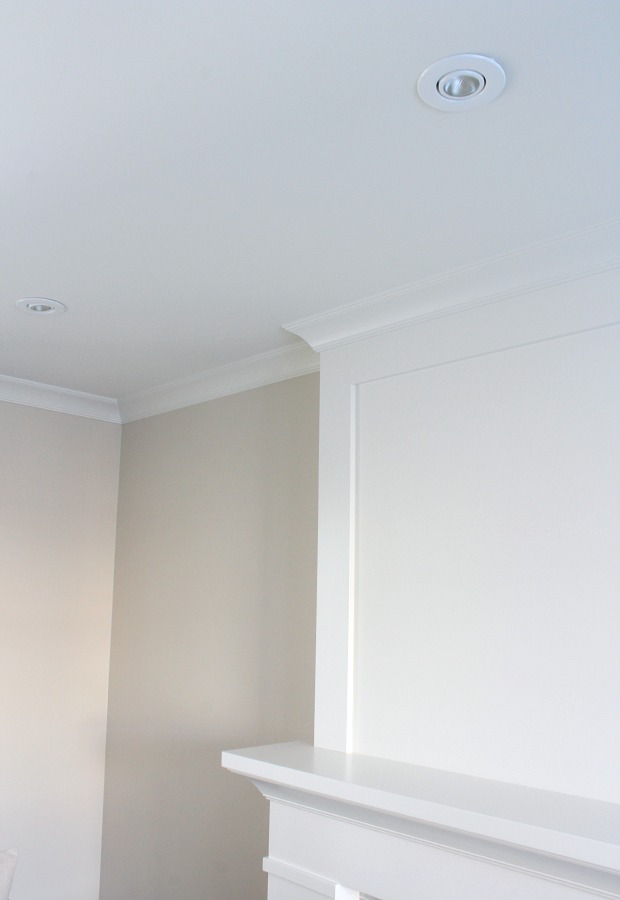
While we were in the mess, we decided to scrape the popcorn ceiling and carried the same Fashion Forward crown moulding around the entire living room. It’s amazing how a simple detail like this can really elevate the look of a room.

Here’s how it looks now with the ceiling painted in White Dove (flat finish) and recessed light fixtures installed. I can’t believe the overall difference it made to the brightness of the living room.
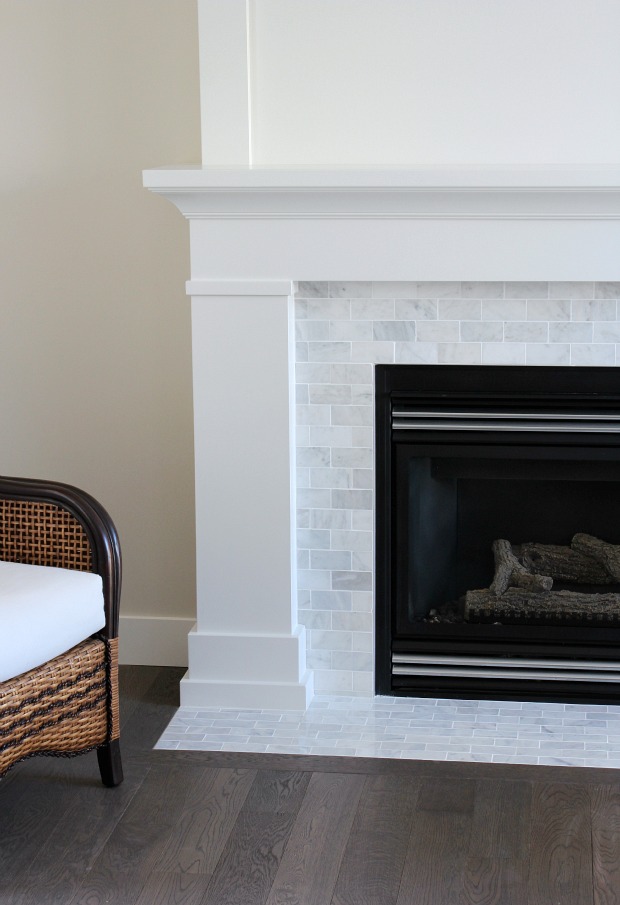
Marble Tile Fireplace Surround
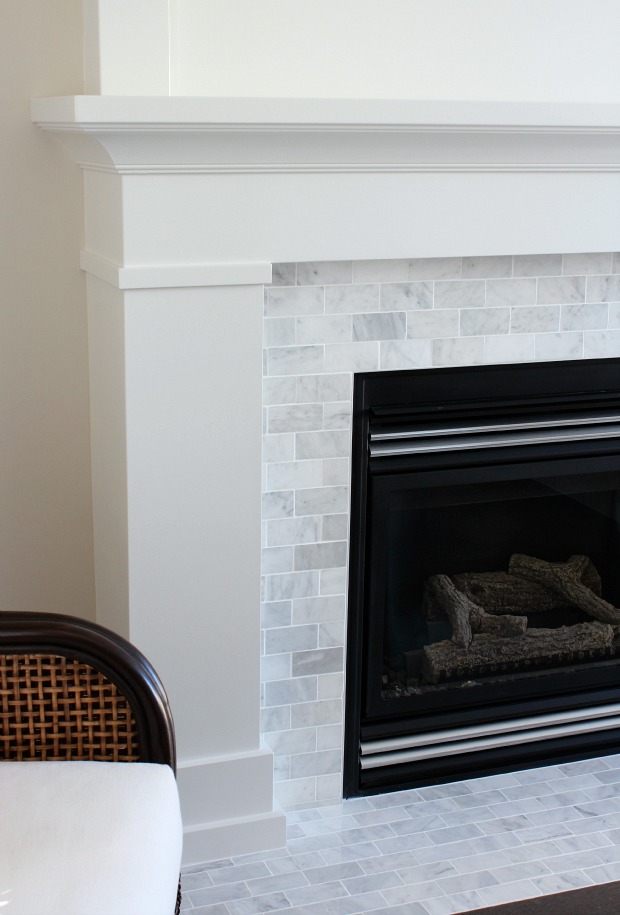
For the fireplace surround and hearth, we selected 2×4 inch polished Carrara marble subway tile. It’s the perfect combination of grey, taupe and white, which helps tie the colours of the entire main floor together.
I believe it’s a style that will stand the test of time, plus I love the look of a marble fireplace surround!

Because marble can vary so much in colour, it’s important to see how the sheets of tile look next to each other before installing.
After laying them all out, I had to exchange a few at the store to get just the right balance, as some were considerably lighter or darker than the others. There were even a few that had weird yellow striations. I recommend doing this before your tile layer starts to avoid a huge disappointment.
Our carpenter accounted for the tile depth when attaching the trim, so our tile installer was able to slide the marble underneath for a seamless look. Always plan ahead.
We opted to go with white grout to match the fireplace and trim throughout the rest of the living room (see details below).

And, finally, to transition from the tile to the new hardwood we installed a picture frame. I love how it finishes off the whole look.

Fireplace Makeover Before and After
Fireplace Before: Here’s a look again at the builder’s basic fireplace we started with…
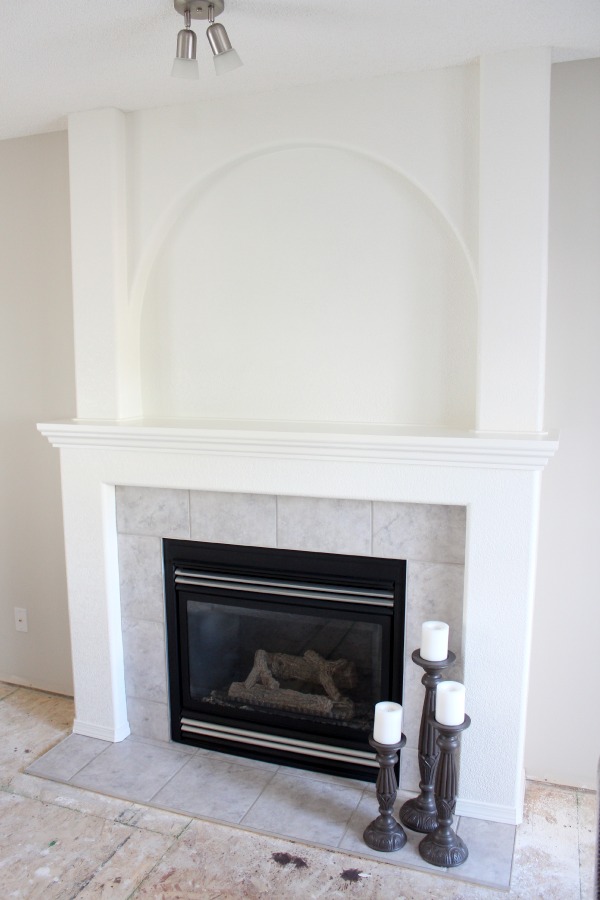
Progress: This is what it looked like after a minor fix up with paint…
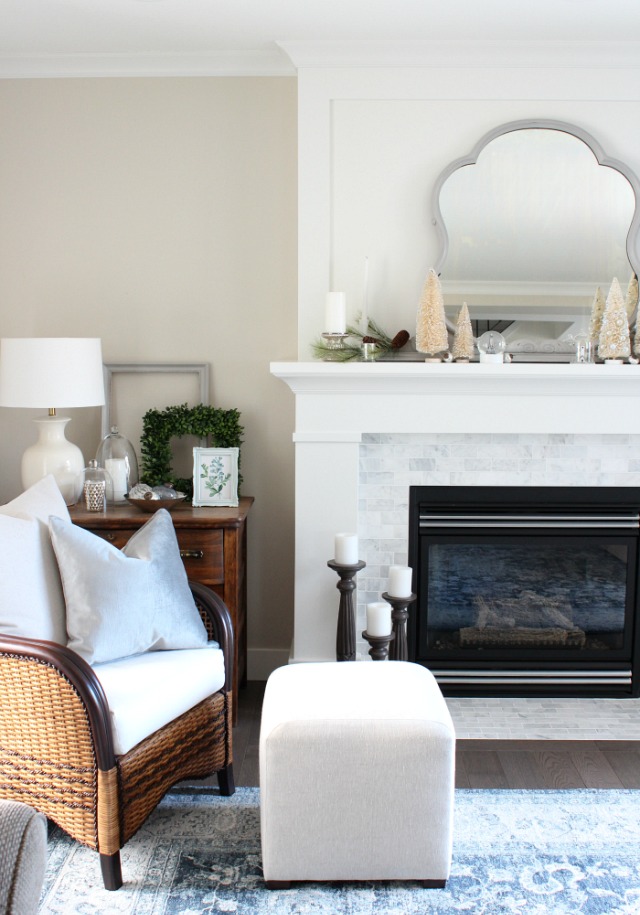
Fireplace After: Finally, here’s a look at our renovated fireplace, with new trim, paint and marble subway tile!

If you’re looking to transform your existing fireplace or build from scratch, here are the finishes we used:
Fireplace Finishes Breakdown
- White Dove Paint
- 2×4″ Marble Subway Tile (see similar Carrara Tile) and Polyblend Bright White Grout
- Crown Moulding
*Some links are affiliates. Check out my blog policies.
I’m so happy to have one more renovation project crossed off our list. Basically, our living room is done except for the decorating, which will happen as I find the pieces we’re looking for like an area rug, mirror, and artwork. It’s always a process!
Be sure to pin this fireplace remodel for later!

Update: Be sure to check out our fireplace mantel decorated for the holidays.
Curious about our living room decor? Head to the Shop Our Home page for many of those details.
And, if you’re curious about the rest of the trim work details, see our shaker style baseboards, window casings and more.
Have any of your own renovation projects going on? Are they going smoothly or are they a little on the challenging side?
Check out more of our home improvement projects, including our kitchen makeover.
Want more home improvement projects like these sent directly to your inbox? Be sure to SUBSCRIBE.
Enjoy your day!

Monumental improvement! The end result is so gorgeous.
Hi. I love the color of your floors. Can you tell me if they’re hardwood restained and what stain did you use? Thank you.
Hi Claudia, We installed pre-finished white oak hardwood from Divine Flooring. The finish is matte.
Hi Shauna, it looks really beautiful!! We did something very similar in our living room a couple of years ago and I still really love. It’s a classic look. Great job.
It’s stunning! I love all the moulding and the marble looks like it was always there.
Oh my gosh, Shauna! What an amazing transformation, honestly. I loved where you were going as this post unfolded, but the real solidifier was in seeing the wood stained mantle and the arch disappear. Just swapping out those two features would have made a major difference, but the full scale change is awesome! I can’t wait (please, pretty please post pics) to see your stockings hung by the chimney (aka fireplace) with care! Love, love, love this new look!
Hi Shauna,
Lovely job! I am in the process of trying to replicate your beautiful work. What size fireplace insert do you have?
Hi Kim, The fireplace insert is 36″ wide by 33″ high.
Oh Shauna it looks GORGEOUS, really – I love the crisp white and the tile (sigh) very well put together! You have done a wonderful job – once again – and a great big ole high five for scraping that popcorn ceiling!!
It turned out beautiful. We are planning to redo our fireplace this year with the same subway tile. Can you tell me more about the flooring? I like the look and color of it. I’ve been searching for new flooring for our main living area.
Hi Resi, Thank you! The flooring is an engineered hardwood – white oak – Mejor – Rainforest Collection – Quadra. It’s a matte finish and so far it’s been pretty to easy to care for- no footprints!
The makeover is beautiful – I love it. Flawless!
Thank you, Amy!
WOW! This transformation is amazing! I love your “after” so much. Those tiles and the trim are perfection.
Thanks, Carissa! We love the combination too. Now just to pull it all together with some decor!
I love the transformation! It’s beautiful!
Thanks for stopping by, Leanne :)
Wow! Stunning! Any chance you know the name of the tile and where you purchased them? I am in the process of doing my fireplace and love your tile selection.
Hi Tammy, We found the tile at Home Depot. We had to visit a few stores to find marble with a consistent look (some had a yellow undertone and others were darker grey. We were looking for something in the middle). Hope this helps!
What size is tile 3″x6″?
It’s 2 x 4.
Is it beveled?
No, just flat. Beveled would be lovely, though, if you could find it!
The renovation is beautiful! May I ask what is your wall color?
Thank you, Shauna. The wall color is BM Baby Fawn. You can see the details here: https://satoridesignforliving.com/2014/09/living-room-paint-refresh/
Hi there… This is so beautiful happens to be the picture I am using to try to makeover our fireplace! I was at Home Depot today trying to find this tile….. Did it come in a sheet? Or separate tiles? Or maybe a brand name if you by chance know it? Thx sooo much!
Hi Carla, We’re in Canada, so that could be why OR it may have been discontinued (it’s been a while since I’ve been down the tile aisle at Home Depot). I have seen marble subway tile (on sheets) at quite a few tile shops. If you do some poking around, you should be able to find something similar. Good luck with your makeover!
Hi Shauna. I love your fireplace and we are remodeling our fireplace to look like yours. What brand and specific white color grout did you use for the tile? I’m having trouble finding a white that will work. I’m not sure about using a light grey.
Thank you!
Hi Kristin, Thank you so much! For the grout, we used Polyblend bright white.
Hi Shauna,
Your fireplace looks amazing. Great color combination and design with the crown molding and subway marble tile. What a great inspiration and great work!
I’m looking to resurface my brick fireplace with similar marble tile and wood mantel.
May I know the width of the mantel leg ? and which type of crown molding you select for the fireplace shelving?
Thanks,
Robin
What’s the depth of the fireplace shelving on the top?
Hi Robin, The top of the mantel is 10″ deep (and wraps around to be 14.5″ from the wall to the front of the “shelf”).
Hi Robin, Thank you! The mantel “leg” width is 9″ without the trim pieces at the bottom. The crown molding is from Metrie’s Fashion Forward line- https://metrie.com/products/CFF1W1PMD/
Hi Shauna,
We are prepping our home for a fireplace that we want to build ourselves and we are using yours as our inspiration! You have done such a great job! I am really struggling with some of the dimensions. Could you tell me how far the “legs” come out from the tile? I am guessing somewhere in the range of 2 to 3 inches? Also, how far does the leg come out from the wall? I am guessing 10 to 12 inches? Also, how tall is the fireplace overall? Thank you so much for your help!
Hi Lindsay,
First off, thanks! Here are the dimensions you requested:
– Height to top of mantel is just under 51″
– Depth of “leg” from wall (not including base trim) is 11″
– Spacing between tile and “leg” is 3.25″
Remember to account for the height of the tile in your calculations. Hope this helps!
Hi Shauna – Do you know if the 2×4 subway tile sheets were Honed or Polished?
We used polished marble tiles.
Hi Shauna,
Did you use a pencil trim around the interior edge, or is it just grouted at the edge by the fireplace insert? It’s really beautiful!
Thanks for your help,
Molly
Hi Molly, There’s a stainless steel trim piece between the fireplace insert and the tile. Hope this helps!
This is beautiful! It has inspired our current project which is to build something similar from scratch. My husband is a gas fitter and a pretty good carpenter. Just curious what the overall width is from outside leg to outside leg. Thanks!
Hi Laura, Good for you! I’d love to see how it turns out. The measurement (not including the trim at the bottom) is just under 69″.
Can you tell me where you bought your tile? It’s exactly what I am looking for.
Hi Grace, We picked it up at Home Depot but I think it may be discontinued now. I have seen similar tile at various tile shops, so search around.
Was it the Jeffrey Court Carrera Marble Subway tile from Home Depot?
Hi Mike, I believe the tile we used has been discontinued at Home Depot. Ours is 2×4, polished and came on a sheet in a brick layout. I’ve seen this style at many tile shops since our renovation, so you should be able to find it if you search around a bit. Good luck :)
Your fireplace is stunning! I’m sure it is even more amazing in person. I also love your rattan chair next to the fireplace with light cushion. Do you mind sharing where you purchased your chair? Many thanks for your detailed post on the details of your fireplace. :)
Thank you, Morgan! Actually, we purchased that chair years ago at Pier 1 Imports. You may still be able to find something similar there. Best of luck :)
This is a beautiful fireplace. Could you send me height & width dimensions?
Are the ceilings high in these photos? I have 8 ft. ceilings in a new home so we are trying to figure out height that we are comfortable with.
Hi Johanna, The ceiling height is 8 feet. The mantel height is just under 51″ and just over 75″ wide (at the biggest point). Hope this helps (you can see a few other measurements in the rest of the comments).
Hi there!
I just recently extended my mantel to the ceiling and am ready to paint. What sheen of paint did you use? Not sure if I want semi gloss or more of an eggshell finish.
Your fireplace is beautiful!
Thanks!
Lori
Hi Lori, Thank you! The trim was sprayed in a semi-gloss water-based lacquer. The inside drywalled portion was painted in an eggshell finish. Hope this helps!
What brand is the fireplace?
Looks realistic.
We are building a home and like the fireplace. Do you have a cut list? Also where can you buy the flooring?
Hi Jaye, We don’t have a cut list but I do mention most of the measurements in the comments. Maybe one day I’ll get a follow up post done. Would be helpful, right?!
We’re in Canada, so I’m not sure where the hardwood is available in the US. The brand is Mejor. Here’s the link to the specifications so that you may be able to find something similar.
https://www.divinefloor.com/products/details/?id=342
We also considered Dansk flooring, so you may want to look at that line too as there are some with a similar look.
Best of luck,
Shauna
Did you tile over the old tile or remove it first? Thanks for sharing!
Hi Liz, We removed the old tile first.
Your fireplace is stunning! We are building a fireplace mantel and surround in our newly renovated home and would love one just like yours. I’m struggling with the scale of the mantel/surround to the size of our wall (we have 8′ high ceilings like yours). What is the width of the wall on which you built your fireplace? The measurements you have provided here through your responses are very helpful.
Hi Anna, Thank you! Our living room is about 15 feet wide. Because we were working with an existing fireplace, I had to keep the sizes similar to what was there. If designing from scratch, I would’ve made the fireplace slightly smaller for the size of the room. However, we are still very happy with the final result.
Thank you for all the information I loved your taste !
Sorry if you have already answered this but I can’t tell from the photos how you finished the side-edge of the subway tile sheets that surround the fireplace on the vertical surface. Did you have to apply a long thin piece of stone trim or did you just smooth out the grout? Hope that makes sense – would circle what I’m talking about in a picture if I could post it here. Also – if you did use a piece of marble trim, where did you buy that?
Looks great.
Best,
– Alex
Hi Alex, There’s a stainless steel trim piece (and grout) between the fireplace insert and the tile. Let me know if you have any other questions.
Hi Shauna,
Really like the look you’ve created. You mentioned the top was made from 1/2” MDF but it looks much thicker than that. Are there multiple layers of MDF board to create the mantel shelf, and how thick is the mantel shelf?
Thanks!
Chris
Hi Chris, We built over the existing board that was there (see progress photos above). Then a trim piece was added all around to finish it off. The mantel shelf is 1.5″ thick.
Hi Shauna- love this fireplace! Do you have a cut list? I have gone through the comments but everything isn’t listed so I was wondering if you pulled it all together in once place! Thank you.
Hi Logan, Unfortunately, I haven’t done that yet. It’s on my list! Please let me know if there are specific measurements you’re requiring in the meantime.
Here’s a post I put together with fireplace measurements and building materials. Hope it helps!
Hi Shauna- you did a beautiful job. Looks great. I was wondering about the fireplace screen. Where did you or how did you do the insert to give it the polished look? I have a similar fireplace and want to place a screen like you did inside. I see a double silver line on the top and bottom and glass doors. Thank you.
Hi Meryl, It’s part of the fireplace insert. It was already installed when we moved in, so I’m not sure what the brand is.
We’re currently in the middle of a similar DIY project, and I’m wondering if you know if your tile layer put the marble subway tiles directly on the subfloor? We are installing engineered hardwood and marble subway tiles. As is they line up perfectly. Did they need to cut out the subfloor to lay cement board before installing the tile? And if they did directly lay the tile on the subfloor, has it held up well? Thanks!
Hi Traci, The tiles were installed directly on the plywood subfloor. They have held up very well (no cracking whatsoever). Because they’re in front of the fireplace, they rarely get stepped on.
Fantastic!! Thank you so much!
Everything looks so beautiful! Wonderful selections and what a significant change of the facade of the fireplace. Nice job!
What a fabulous job on this fireplace renovation! We’re using your design as a model for our mantle. Would you mind sharing where you got the beautiful blue rug? Thanks.
Hi Nancy, Thank you! The rug is from Wayfair. It’s called Corydon Distressed Navy Area Rug by Charlton Home. I’m not sure it’s still available, but you may be able to search and find one that’s similar. Good luck :)
Your fireplace looks great! How did you connect the tile to the wood floors? Grout?
Hi Megan, We used Schluter edging.